
Spring 프로젝트 생성 (without spring boot)
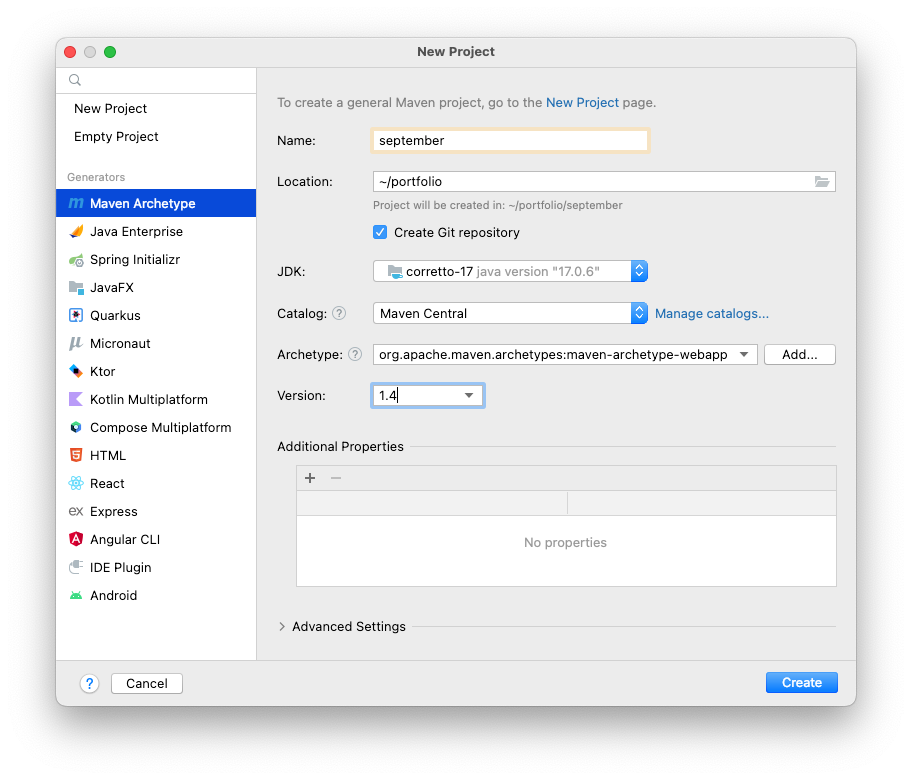
인텔리제이로 스프링 프로젝트 생성
인텔리제이를 사용하여 스프링 부트가 아닌 스프링 프로젝트를 생성하는 과정은 아래와 같다.
프로젝트 생성
pom.xml 작성
프로젝트에 필요한 의존성을 명시한다.
<?xml version="1.0" encoding="UTF-8"?>

<project xmlns="http://maven.apache.org/POM/4.0.0" xmlns:xsi="http://www.w3.org/2001/XMLSchema-instance"
  xsi:schemaLocation="http://maven.apache.org/POM/4.0.0 http://maven.apache.org/xsd/maven-4.0.0.xsd">
  <modelVersion>4.0.0</modelVersion>

  <groupId>org.example</groupId>
  <artifactId>september</artifactId>
  <version>1.0-SNAPSHOT</version>
  <packaging>war</packaging>

  <name>september Maven Webapp</name>
  <url>http://localhost:8080/</url>

  <properties>
    <project.build.sourceEncoding>UTF-8</project.build.sourceEncoding>
    <maven.compiler.source>1.7</maven.compiler.source>
    <maven.compiler.target>1.7</maven.compiler.target>
  </properties>

  <dependencies>
    <dependency>
      <groupId>junit</groupId>
      <artifactId>junit</artifactId>
      <version>4.11</version>
      <scope>test</scope>
    </dependency>
    <!-- https://mvnrepository.com/artifact/org.springframework/spring-webmvc -->
    <dependency>
      <groupId>org.springframework</groupId>
      <artifactId>spring-webmvc</artifactId>
      <version>6.0.11</version>
    </dependency>
    <!-- https://mvnrepository.com/artifact/org.springframework/spring-jdbc -->
    <dependency>
      <groupId>org.springframework</groupId>
      <artifactId>spring-jdbc</artifactId>
      <version>6.0.11</version>
    </dependency>
    <!-- https://mvnrepository.com/artifact/org.springframework.security/spring-security-web -->
    <dependency>
      <groupId>org.springframework.security</groupId>
      <artifactId>spring-security-web</artifactId>
      <version>6.1.3</version>
    </dependency>
    <!-- https://mvnrepository.com/artifact/org.springframework.security/spring-security-config -->
    <dependency>
      <groupId>org.springframework.security</groupId>
      <artifactId>spring-security-config</artifactId>
      <version>6.1.3</version>
    </dependency>
    <!-- https://mvnrepository.com/artifact/com.mysql/mysql-connector-j -->
    <dependency>
      <groupId>com.mysql</groupId>
      <artifactId>mysql-connector-j</artifactId>
      <version>8.1.0</version>
    </dependency>
    <!-- https://mvnrepository.com/artifact/com.fasterxml.jackson.core/jackson-core -->
    <dependency>
      <groupId>com.fasterxml.jackson.core</groupId>
      <artifactId>jackson-core</artifactId>
      <version>2.15.2</version>
    </dependency>
    <!-- https://mvnrepository.com/artifact/jakarta.servlet/jakarta.servlet-api -->
    <dependency>
      <groupId>jakarta.servlet</groupId>
      <artifactId>jakarta.servlet-api</artifactId>
      <version>6.0.0</version>
      <scope>provided</scope>
    </dependency>
  </dependencies>

  <build>
    <finalName>september</finalName>
    <pluginManagement><!-- lock down plugins versions to avoid using Maven defaults (may be moved to parent pom) -->
      <plugins>
        <plugin>
          <artifactId>maven-clean-plugin</artifactId>
          <version>3.1.0</version>
        </plugin>
        <!-- see http://maven.apache.org/ref/current/maven-core/default-bindings.html#Plugin_bindings_for_war_packaging -->
        <plugin>
          <artifactId>maven-resources-plugin</artifactId>
          <version>3.0.2</version>
        </plugin>
        <plugin>
          <artifactId>maven-compiler-plugin</artifactId>
          <version>3.8.0</version>
        </plugin>
        <plugin>
          <artifactId>maven-surefire-plugin</artifactId>
          <version>2.22.1</version>
        </plugin>
        <plugin>
          <artifactId>maven-war-plugin</artifactId>
          <version>3.2.2</version>
        </plugin>
        <plugin>
          <artifactId>maven-install-plugin</artifactId>
          <version>2.5.2</version>
        </plugin>
        <plugin>
          <artifactId>maven-deploy-plugin</artifactId>
          <version>2.8.2</version>
        </plugin>
      </plugins>
    </pluginManagement>
  </build>
</project>
web.xml 설정 (Context 정의)
웹 애플리케이션을 서블릿 컨테이너(톰캣)에 배포할 때 해당 애플리케이션의 컨텍스트를 전달한다. 서블릿 컨테이너는 web.xml 파일을 읽고 서블릿을 생성한다. 생성된 서블릿은 애플리케이션으로의 진입점(end point)가 된다.
좀 더 자세히는 Root ApplicationContext와 WebApplicationContext를 설정한다. 하나의 웹 애플리케이션은 여러 개의 WebApplicationContext를 가질 수 있지만 Root ApplicationContext는 하나만 가진다.
- Root(Spring) ApplicationContext -
ContextLoaderListener에 의해 초기화 되며 스프링 애플리케이션 전체의 컨텍스트(Bean의 집합, 스프링 컨테이너 외부의 자원 등)를 설정한다. - WebApplicationContext - DispatcherServlet의 컨텍스트를 설정한다. Controller, Veiw Resolver, Handler Mapping과 같이 웹 계층에 대한 설정이 정의되어 있다.
Spring Boot는 @Bean으로 지정된 클래스의 인스턴스들을 자동으로 생성한다. @SpringBootApplication 어노테이션은 @Configuration @EnableAutoConfiguration @ComponentScan의 조합이기 때문이다. 하지만 순수 스프링 애플리케이션의 경우 Componet scan의 범위를 명시해주어야 해당 범위의 Component들이 빈으로 등록된다.
<!DOCTYPE web-app PUBLIC
 "-//Sun Microsystems, Inc.//DTD Web Application 2.3//EN"
 "http://java.sun.com/dtd/web-app_2_3.dtd" >

<web-app xmlns="http://xmlns.jcp.org/xml/ns/javaee"
  xmlns:xsi="http://www.w3.org/2001/XMLSchema-instance"
  xsi:schemaLocation="http://xmlns.jcp.org/xml/ns/javaee
    http://xmlns.jcp.org/xml/ns/javaee/web-app_3_1.xsd"
  version="3.1">

  <display-name>september project</display-name>

  <listener>
    <listener-class>org.springframework.web.context.ContextLoaderListener</listener-class>
  </listener>

  <context-param>
    <param-name>contextConfigLocation</param-name>
    <param-value>
      classpath*:com/example/september/config/RootApplicationContext.java
    </param-value>
  </context-param>

  <servlet>
    <servlet-name>dispatcher</servlet-name>
    <servlet-class>org.springframework.web.servlet.DispatcherServlet</servlet-class>
    <init-param>
      <param-name>contextClass</param-name>
      <param-value>
        org.springframework.web.context.support.AnnotationConfigWebApplicationContext
      </param-value>
    </init-param>
    <init-param>
      <param-name>contextConfigLocation</param-name>
      <param-value>
        com.example.september.config.WebApplicationContext
      </param-value>
    </init-param>
    <load-on-startup>1</load-on-startup>
  </servlet>

  <servlet-mapping>
    <servlet-name>dispatcher</servlet-name>
    <url-pattern>/</url-pattern>
  </servlet-mapping>

  <filter>
    <filter-name>encodngFilter</filter-name>
    <filter-class>
      org.springframework.web.filter.CharacterEncodingFilter
    </filter-class>
    <init-param>
      <param-name>encoding</param-name>
      <param-value>UTF-8</param-value>
    </init-param>
  </filter>

  <filter-mapping>
    <filter-name>encodngFilter</filter-name>
    <url-pattern>/*</url-pattern>
  </filter-mapping>

</web-app>
RootApplicationContext
애플리케이션 전체가 공유하는 컨텍스트(의존하는 Bean)는 아래의 클래스에 정의되어 있다.
com.example.september.config.WebApplicationContext.java
package com.example.september.config;

import org.springframework.context.annotation.ComponentScan;
import org.springframework.context.annotation.Configuration;

@Configuration
@ComponentScan(basePackages = {
        "com.example.september.config.application"
})
public class RootApplicationContext {
}
WebApplicationContext
웹 계층(애플리케이션의 엔드포인트)에 대해 설정한다. 구체적으로는 컨트롤러와 뷰 리졸버에 대한 설정이다.
@Configuration
@ComponentScan(basePackages = {
        "com.example.september.config.web",           // view resolver에 대한 설정
        "com.example.september.domain.member.api",    // controller 빈 등록
})
public class WebApplicationContext {

}
스프링 MVC 핵심 구성 요소
스프링 MVC는 웹 요청을 처리할 수 있는 프레임워크이다.
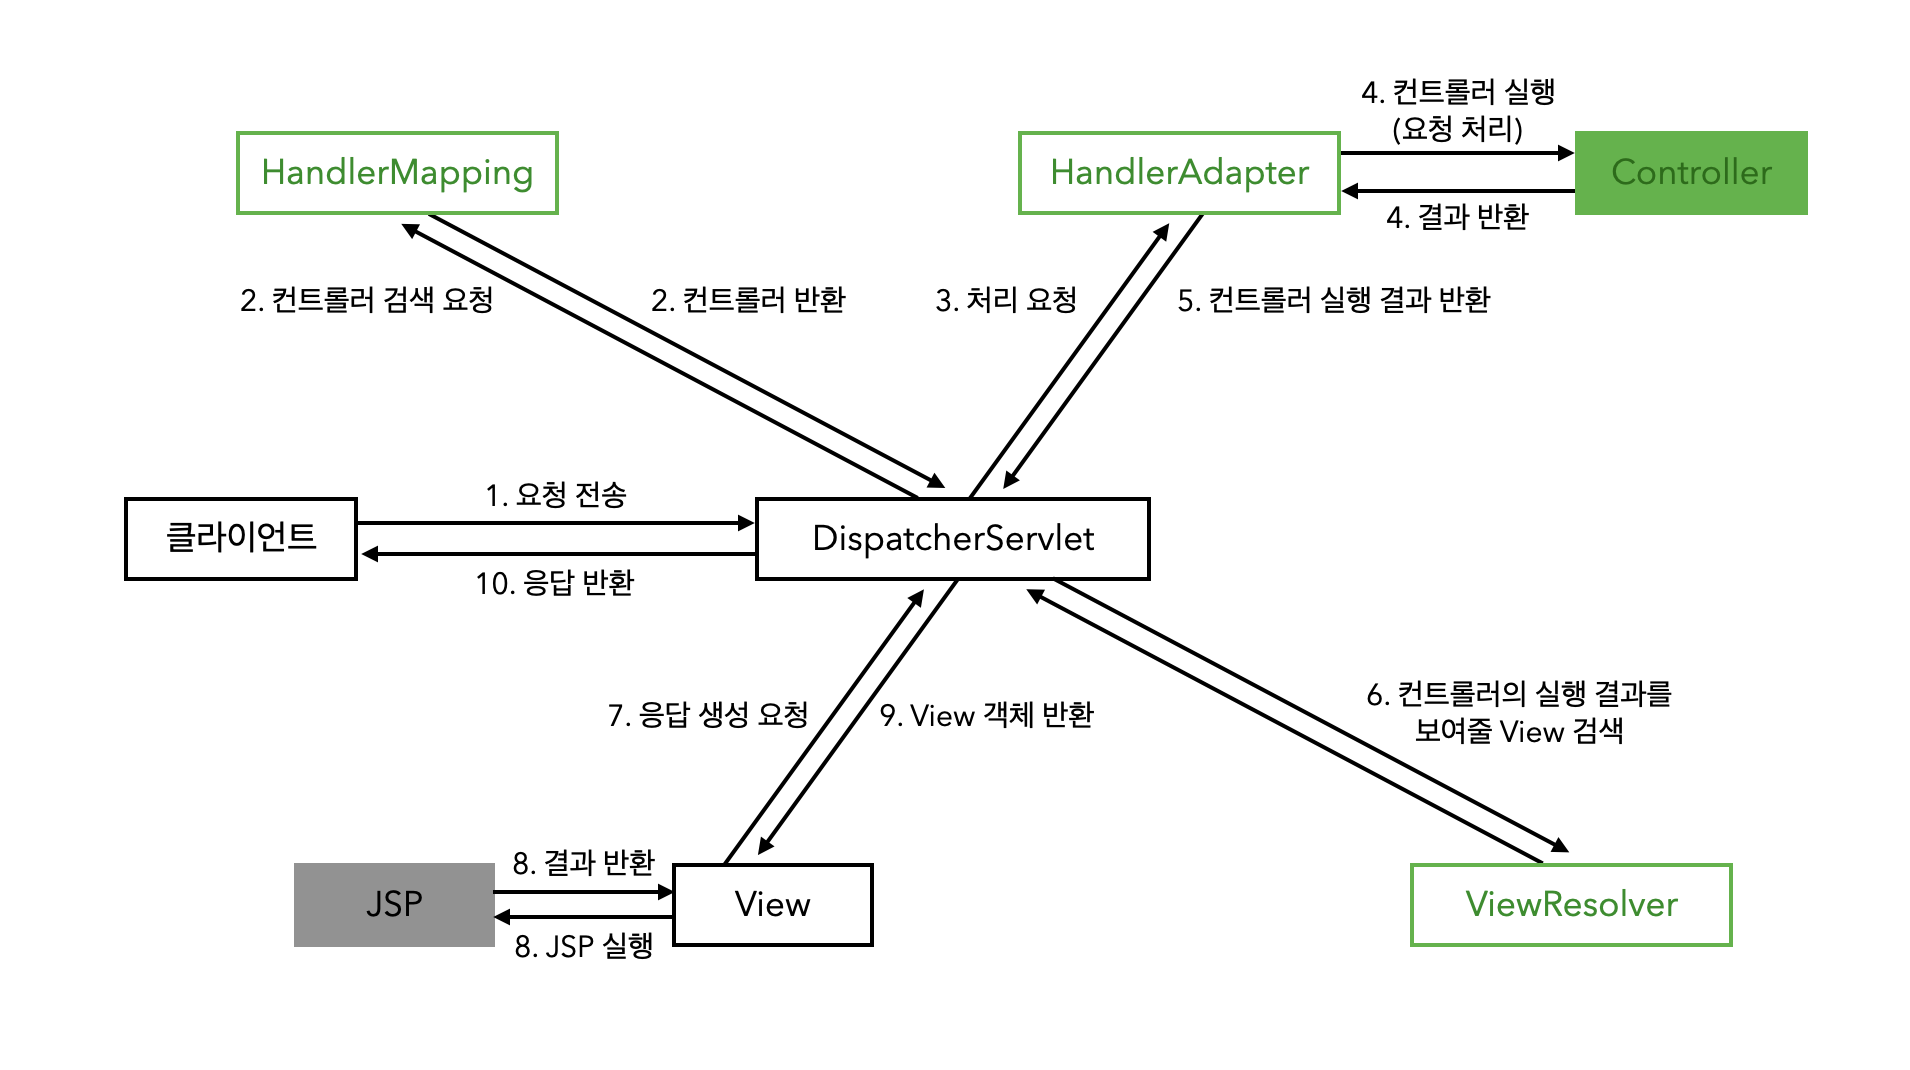
테두리가 초록색인 도형은 스프링 Bean으로 등록해야 하는 대상이다. 배경이 채워진 요소는 개발자가 직접 구현해야 하는 요소이다.
@RestController 어노테이션이 붙은 컨트롤러가 ModelAndView 객체를 반환하면 적절한 View를 찾고 다른 객체를 반환하면 JSON으로 직렬화를 시도한다.
컨트롤러가 반환한 객체는 HandlerAdapter의 처리를 거쳐 DispatcherServlet에게 전달된다.
@EnableWebMvc 어노테이션을 Configuration 클래스에 붙이면 MVC에 관련된 빈을 알아서 생성해준다. 그리고 해당 설정 클래스의 메서드를 실행하여 MVC 설정을 추가로 생성한다. 예를 들면 아래의 코드는 ViewResolver 설정을 추가한다.
@Configuration
@EnableWebMvc
public class MvcConfig implements WebMvcConfigurer {

    @Override
    public void configureDefaultServletHandling(
        DefaultServletHandlerConfigurer configurer) {
        configurer.enable();
    }

    @Override
    public void configureViewResolvers(ViewREsolverRegistry registry) {
        registry.jsp("/WEB-INF/view/", ".jsp");
    }
}
위의 설정에서 첫 번째 메서드는 DefaultServletHttpRequestHandler와 SimpleUrlHandlerMapping Bean을 추가한다.
DispatcherServlet의 요청 처리 과정
RequestMappingHandlerMapping이 적절한 Handler를 찾지 못하는 경우SimpleUrlHandlerMapping을 사용하여 요청을 처리할 Handler를 찾는다.SimpleUrlHandlerMapping은 모든 경로(“/**“)에 대해DefaultServletHttpRequestHandler를 반환한다.- DispatcherServlet은
DefaultServletHttpRequestHandler에게 처리를 부탁한다. DefaultServletHttpRequestHandler는 디폴트 서블릿에 처리를 위임한다.
Comments